Kickstand Module
How the Idea developed

The Idea to Concept
Our Marketing plan has us marketing to the current 2D printing retailers in the area. So we are not going to print thousands of business cards, instead we are going to 3D print our marketing “cards”. The prototypes look pretty good, BUT if they are standing up they would look a lot better.
I had the idea to add a kickstand to the back of the “card”
Converting into 3D
So I opened the Business Card file in 3D graphics software and created four .8mm layers with chunks taken out of them.
- The bottom layer (green) has the actual kickstand outlined in it
- The next is the flex layer (blue) which is so thin that it will allow the plastic to bend
- The next is the Space layer (white) which has the area behind the kick stand cut away so the printer will leave it mostly empty
- The top layer is solid to give and adhesion point for all the layers below and the business card above.

Prototyping
Since we are dealing with very thin layers with an internal “blank” space, I wanted to prototype the stand element alone. This allowed me to use much less material and get the result quicker. Not “instant gratification” we are dealing with a 3D printer, but faster.
The prototype worked the first time…. mostly. There were a couple of “tuning” points which I included while attaching it to the previously designed Business Card.

Print it
Next get printer loaded with a changing color filament (“ink”) and setup for the print. Once you get it started, you do the wait and check, wait and check and more waiting and checking. This print actually took 1.5 hours to finish.

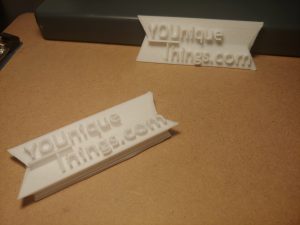
The Result
Once the print was finished we checked it out and the kick stand worked fine. We had a couple more tuning elements to put into before we set it up for “mass” production. Can you see the Tuning needed? Adding the layers on the back pushed the lettering further out, so much so, that some did not attach correctly.
The way the printer is set up we can print 18 of these units at a time. It saves a great deal of time to do a mas print, but if something goes wrong you have wasted a lot more material and time.


.
